|
|
Night Table for RoadTrek 210 |
|
|
|
|
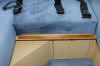
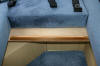
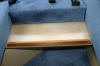
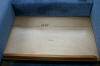
This project took about 4 hour plus finish time to complete. It started
with the need for a night table for our glasses, water, books, remote
controls, medications etc... It began with a section of 1/2" cabinet
grade plywood we had around the garage from a previous project and a
section of red cedar again left over from a project. First step is to
cut out a 25.75" x 16" section. Then centered 6" from the back make 2
cutouts one on each side to allow the rubber bumpers to lock the table
in place. I cut down a 1 x 4 section of cedar to about 1x1.5 and used a
sander to shape. This was then glued and screwed to the front to the
table. It was finished with satin polyurethane and ready to use. This
takes seconds to bring out or put away and is not in the way when you
get up. ev.gif" id="fpGalleryLeftBtn_6806" onclick="JavaScript:fp_ScrollLeft(6806)" width="25" height="29" />
|

This project took about 4 hour plus finish time to complete. It started with the need for a night table for our glasses, water, books, remote controls, medications etc... It began with a section of 1/2" cabinet grade plywood we had around the garage from a previous project and a section of red cedar again left over from a project. First step is to cut out a 25.75" x 16" section. Then centered 6" from the back make 2 cutouts one on each side to allow the rubber bumpers to lock the table in place. I cut down a 1 x 4 section of cedar to about 1x1.5 and used a sander to shape. This was then glued and screwed to the front to the table. It was finished with satin polyurethane and ready to use. This takes seconds to bring out or put away and is not in the way when you get up.
We hope you find this useful and will drop us a note via our comment/feedback page.
Thanks Dan & Javoni
This site was last updated